

Git Installation and Startup Commands
We will examine examples prepared with Git installation, commands and parameters, which are frequently used in project development. With a simple and understandable explanation, you will have nothing missing about Git.
We will go through the installation and initialization of Git, which is almost the same age as Linux. In addition, we will learn a few simple Git commands that can be used in many projects such as python, xcode, php, Java.
The commands we will learn in this section are “-git status“,“-git init“,“-git add“,“-git commit“, “-git restore“,“-git log“, “-git switch“, “-gitbranch“,“-git checkout“.
Index
How to Install Git?
Microsoft Git Setup
Git installation varies according to the operating system you are using. If you are using Microsoft Operating System:
You can download the setup file suitable for the Windows platform you are using by visiting the address. When the download is finished, proceed to the installation phase and finish the installation by following the steps which are quite simple. When the installation process is complete, you should now have a Terminal application ready to run Git commands.
Git Setup on Apple Mac Operating System
If you have an Apple-based operating system, you do not need to install Git separately. Because the Git application is embedded in the Mac operating system.
Since we will work on the Mac Operating System in the subject expression about Git, the expression will be made accordingly. However, you can easily work on Linux and Microsoft operating systems in parallel. This is because we will run the same commands on all operating systems after installation.
Some of the Commands to Get Started with Git
First, let’s set the information that will be our signature in our projects.
1- Setting the name, surname and email address
Name, surname and email address will be enough. This signature will be automatically printed on all projects to be submitted to GitHub. In the section that says Omer Sahin, write your own name and email address respectively.
git config --global user.name "Omer Sahin"
git config --global user.email bilgi@omersahin.com.tr2- Create a Work Folder
Let’s create a work folder:
mkdir Projelerim3- Is the Git application working?
To check the status, run the following command in the terminal:
git status
4- Run/activate the Git application
Before activating git, make sure to check the status as in picture (3) and if there is no git running, run it by typing the following command:
git init
To access the hidden folder .git:
cd .gitCreate a file named test1.txt with the following command. Open the file in the Finder (Explorer), type some data into it and close it.
touch test1.txt5- Add to Stag Area
To add test1.txt to stag, use -add and then check with status. On Mac operating systems, you can make hidden directories and files visible with“Command+Shift+.” in the Finder window.
git add test1.txt
git statusIf you have accidentally added to the stag field, the solution is very simple:
git rm --cached test1.txt
git statusIf you want to add all files to the stag area, put a period (.) after the add command:
git add .
git status6- Commit -m Komutu
Every commit should have a message (-m). This is used to give information about what has been done in this development. Usually the message section is written in English.
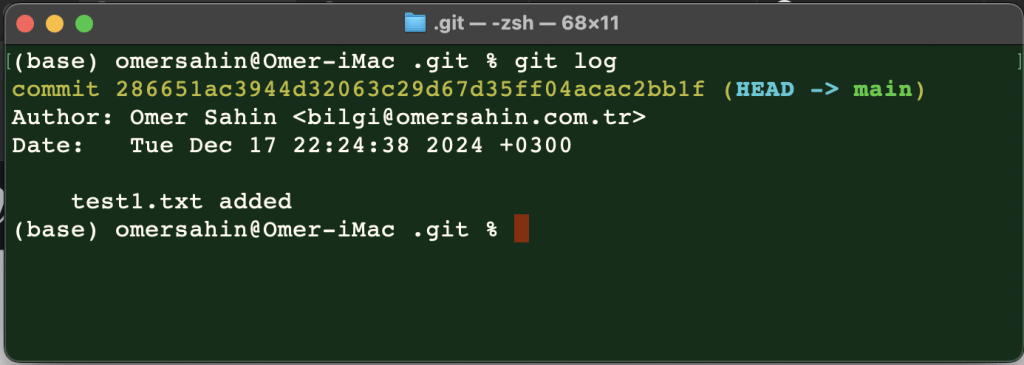
git commit -m "test1.txt added" The -log command is used to check the commit operation.
git logTerminal output:
7- Restore Komutu
This command is used to restore the project to its previous state when only a certain part of the project has been modified. Restore command is used as follows:
git restore text1.txtBranch Creation
After the above steps, run the -branch command to create a branch, if a branch is not created, it will be displayed as *main.
git branch1- Creating a New Branch
To create a new branch:
git branch br12- Select Branch (-switch)
It is used to switch between different branches. First, let’s create another branch named “br2” and switch between them.
git branch br2

git switch br1
git switch br2When you change the branch with the -switch command in Git environment, you can see the files you -commit on that branch in the Finder screen. If another branch is selected, these files appear to be deleted. However, they are not deleted but hidden.
3- Merge
It is used to merge multiple created branch sections under a single branch. Before executing the command, -main branch must be selected.
git switch main

git merge br1Screen Output:

Editor Settings for Git
Using Git with Sublime Text Editor
Download the version of Sublime Text suitable for your operating system from the official website.
After the Sublime download is finished, let’s go to our Terminal application and make the necessary definition:
git config --global core.editor "sublime -n -w"Git Conflict Status
In branches, the -conflict command is used to avoid conflicts between different users.
If different users modify and commit the same file in the same branch, when merging these branches with the -merge command, it will give a conflict error between the main and feature branches as in the example below. It will ask us to resolve this conflict and then merge.
git merge feature

Auto-merging text1.txt
CONFLICT (content): Merge conflict in text1.txt
Automatic merge failed; fix conflicts and then commit the result.Then, when we open text1.txt and text2.txt files in the Finder (Explorer) window with Sublime Editor, we see that the data has changed as in the picture below.

<<<<<<< HEAD
========
>>>>>>> feature
manually delete and save the sections in Sublime Editor manually and then run the following command in Terminal:
git add .
git commit -m "conflict solved"
Git Checkout (Back to Previous Commit)
To return to any of the previous commits, list all commits with“-git log” and copy the ID number of the commit you want to return to and type the command as follows:
git checkout f6ed2257498ad6e219892c9aca619bAt this stage you will actually be asked to decide. Are you going to come back and continue with a different branch or are you going to continue on the same branch?
For scenario 1:
git branch feature
git add .
git commit -m "feature has added"With this command we created a completely different branch.
For scenario 2:
git switch main
git add .
git commit -m "text1.txt has commited"
Git Reset and Git Revert Commands
There are two different methods to delete a committed branch. Let’s explain both of them with examples respectively.
1- How to Use the Reset Command?
With the reset –hard commit_ID command, commits after this id are completely deleted.
git reset --hard 589f906f3e25dcf75f1b9b87032828f277ee08882- Revert
The Revert command commits from wherever you want. It does not delete previous or subsequent commits.
git revert 589f906f3e25dcf75f1b9b87032828f277ee0888

git add .
git revert --continue
Git Tag (Versioning)
You can tag with -tag to indicate which version of the project you are working on.
git tag 2.4.0.1

git tag
2.4.0.1

git tag 2.4.0.2

git tag
2.4.0.1
2.4.0.2Starting with git installation, the most commonly used git commands are explained with examples.
The next step will be to establish a connection between GitHub and Git and transfer the project to GitHub. You should definitely take a look at our article titled “How to Connect GitHub and Git“.


MAKE A COMMENT
COMMENTS - 0 COMMENTS