
Django with Jinja Syntax
Thanks to Jinja Syntax you can use many dynamic parameters between Html tags with Python Django. This can be a variable, a loop or a control structure. Do you want to learn Jinja Syntax, which will make your work much easier?

Jinja Syntax provides convenience in many areas including Python, Django and Html. Especially Jinja Syntax acts as a bridge between Python and Web Html.
Before starting our Jinja syntax article, we recommend you to read our article titled Django Template Structure.
Project GitHub Source:
https://github.com/omersahintr/WebApps
Index
- How to Install Jinja Syntax?
- Sending Data with Jinja Method
- How to Use For Loop with Jinja?
- IF-Else Control Structures with Jinja
- Jinja Syntax with Filter Procedure
- Using URL (link-navigation) with Jinja
- Inheritance in Django Template Html (Template Inheritance)
- How to Make a Fixed 404 Page with Django?
- Creating Static Pages and Media
How to Install Jinja Syntax?
If you want to master the Jinja Syntax clauses on the VS Code side, you should install the Django package from the VS Code>Extensions tab. https://marketplace.visualstudio.com/items?itemName=batisteo.vscode-django
After installing the Django plugin package in VS Code, you will be able to see all Jinja code between HTML tags.
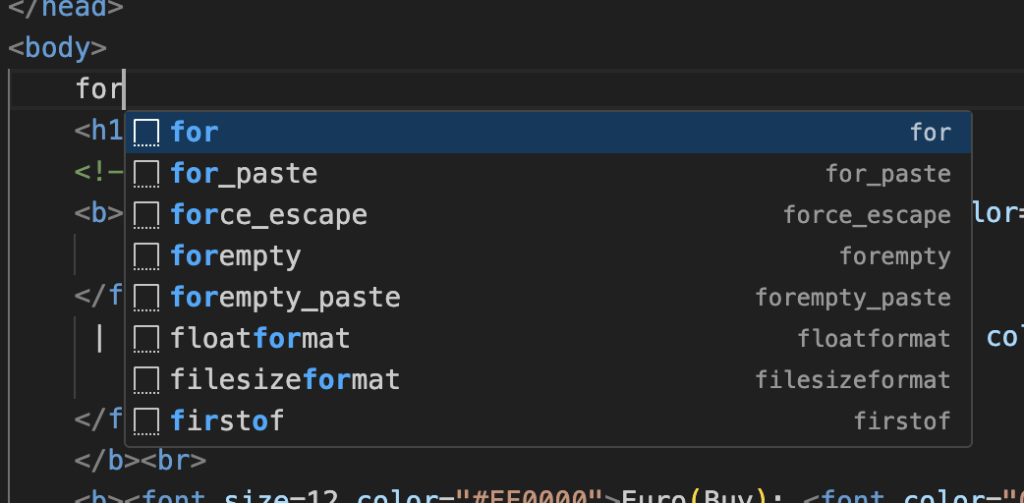
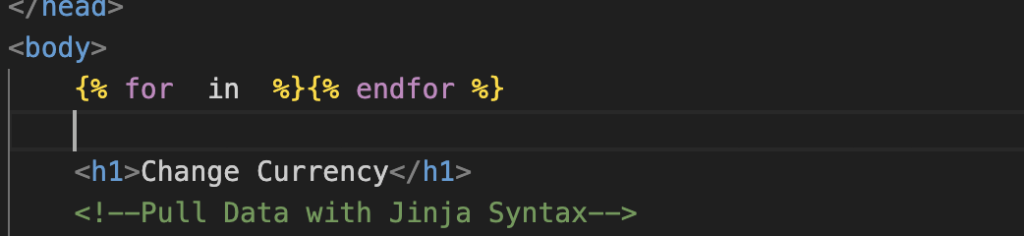
After installing the Django Expansion Pack in VS Code, when you type for for example as above, the usage method will be automatically printed between the Html tags as follows.
Sending Data with Jinja Method
Imagine you are pulling currency data from a live Api or Json source. In this example we will define it in dictionary and List data types. How can we print this information in an HTML page?
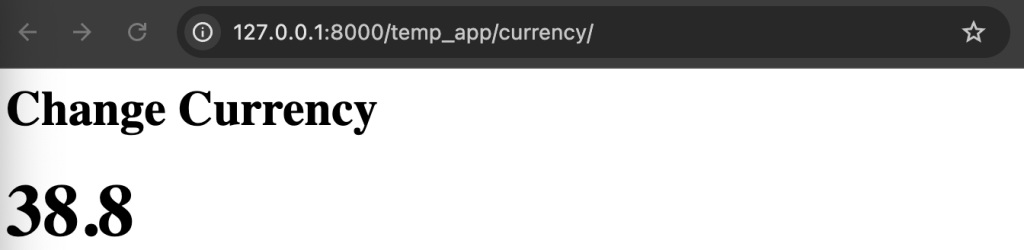
While defining with the render method in the function, we will send the currency data we define to the Html page with the “context=” parameter. Let’s make changes in temp_app/views.py file as follows.
from django.shortcuts import render
from django.http import HttpResponse
from django.urls import reverse


def index(request):
    return render(request,"temp_app/first.html")

def currency(request):
    currency_dict = {"Dollar":38.8, "Euro":44.05, "Gold":3982.44, "BTC":4237678.26}

return render(request,"temp_app/currency.html",context=currency_dict)We defined a dictionary called currency_dict and added some data in it. We will run render as return and send data to the Html page with the context parameter.
The data sent from the python file can be printed on the page by writing the data keys with Django with Jinja Syntax in the html page. For this we will make use of {{ }} curly brackets. Let’s see it typed in currency.html.
<html lang="en">
<head>
    <meta charset="UTF-8">
    <meta name="viewport" content="width=device-width, initial-scale=1.0">
    <title>Change Office</title>
</head>
<body>
    <h1>Change Currency</h1>
    <!--Pull Data with Jinja Syntax-->
    {{Dollar}}
</body>
</html>
</html>Jinja Syntax will not work outside Django. There is no such typing method on standard web servers. It only works on the Django server. It will look like this on the screen:
You can even print this data on the screen by designing it as you wish with HTML tags.
<html lang="en">
<head>
    <meta charset="UTF-8">
    <meta name="viewport" content="width=device-width, initial-scale=1.0">
    <title>Change Office</title>
</head>
<body>
    <h1>Change Currency</h1>
    <!--Pull Data with Jinja Syntax-->
    <b><font size=12 color="#FF0000">Dollar: <font color="000000">{{Dollar}}</font></font></b><br>
    <b><font size=12 color="#FF0000">Euro: <font color="000000">{{Euro}}</font></font></b><br>
    <b><font size=12 color="#FF0000">Gold: <font color="000000">{{Gold}}</font></font></b><br>
    <b><font size=12 color="#FF0000">BTC: <font color="000000">{{BTC}}</font></font></b><br>

</body>
</html>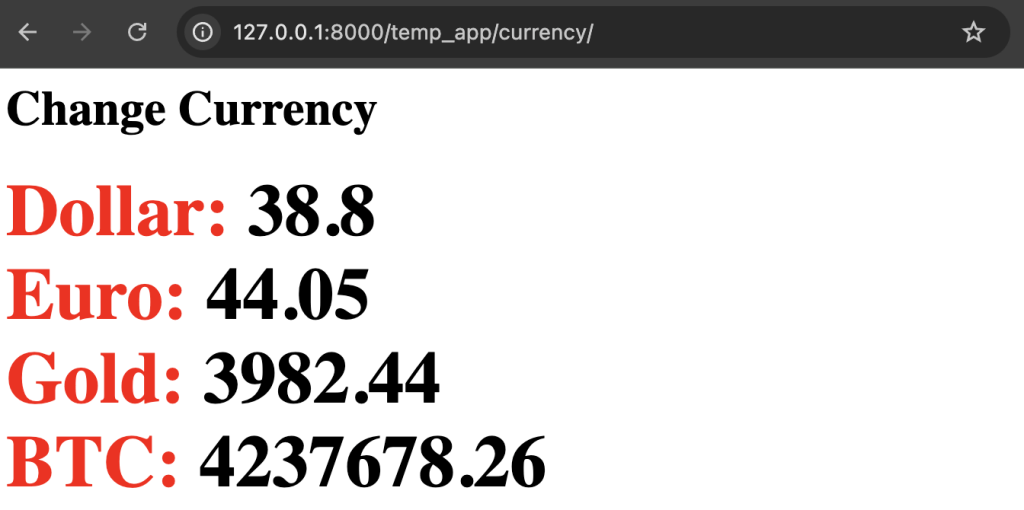
Dynamic Data Variables in Html Page
How to show data generated with python in Html page with different variations and scenarios?
List Variable Data in Dictionary
For example, in the last example scenario, if the buying and selling figures of the currencies are defined with a list in the dictionary, how to send it to the Html page.
Loop and control structures can be executed with Jinja Syntax. Even a list index can be called. To do this, put a period at the end of the parameter variable and write the index. Like “Dollar.0“. Let’s see on the example:
from django.shortcuts import render
from django.http import HttpResponse
from django.urls import reverse

# Create your views here.
def index(request):
    return render(request,"temp_app/first.html")

def currency(request):
    currency_dict = {"Dollar":[37.7,38.8],
                     "Euro":[43.55,44.05],
                     "Gold":[3890.05,3982.44],
                     "BTC":4237678.26}

    return render(request,"temp_app/currency.html",context=currency_dict)
<html lang="en">
<head>
    <meta charset="UTF-8">
    <meta name="viewport" content="width=device-width, initial-scale=1.0">
    <title>Change Office</title>
</head>
<body>
    <h1>Change Currency</h1>
    <!--Pull Data with Jinja Syntax-->
    <b><font size=12 color="#FF0000">Dollar: <font color="000000">{{Dollar}}</font></font></b><br>
    <b><font size=12 color="#FF0000">Euro: <font color="000000">{{Euro}}</font></font></b><br>
    <b><font size=12 color="#FF0000">Gold: <font color="000000">{{Gold}}</font></font></b><br>
    <b><font size=12 color="#FF0000">BTC: <font color="000000">{{BTC}}</font></font></b><br>

</body>
</html>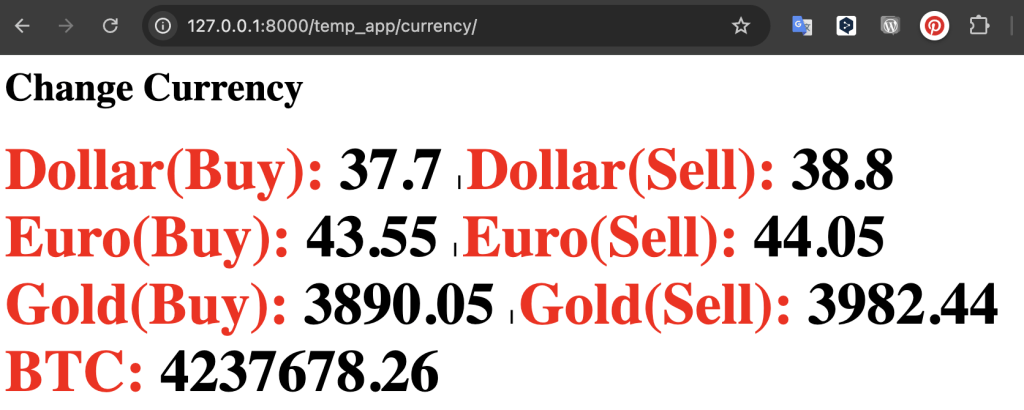
Dictionary in Dictionary Variable Data
Let’s imagine that the data is represented in a dictionary and one of these dictionary elements also has a dictionary variable. For nested dictionary variables, {{maindictionary.sub_dictionary}} is used like {{BTC.Ethereum}}.
For example, in the BTC Cryptocurrency dictionary, there are sell values for Ethereum, Doge Coin and Lite Coin.
from django.shortcuts import render
from django.http import HttpResponse
from django.urls import reverse

# Create your views here.
def index(request):
    return render(request,"temp_app/first.html")

def currency(request):
    currency_dict = {"Dollar":[37.7,38.8],
                     "Euro":[43.55,44.05],
                     "Gold":[3890.05,3982.44],
                     "BTC":{"Ethereum":100590.84,"Doge":9.15,"Lite":3794.85}
                     }

    return render(request,"temp_app/currency.html",context=currency_dict)
<html lang="en">
<head>
    <meta charset="UTF-8">
    <meta name="viewport" content="width=device-width, initial-scale=1.0">
    <title>Change Office</title>
</head>
<body>
    <h1>Change Currency</h1>
    <!--Pull Data with Jinja Syntax-->
    <b><font size=12 color="#FF0000">Dollar(Buy): <font color="000000">
        {{Dollar.0}}
    </font></font>
     | <font size=12 color="#FF0000">  Dollar(Sell): <font color="000000">
        {{Dollar.1}}
    </font></font>
    </b><br>
    <b><font size=12 color="#FF0000">Euro(Buy): <font color="000000">
        {{Euro.0}}
        </font></font>
     | <font size=12 color="#FF0000">Euro(Sell): <font color="000000">
        {{Euro.1}}
        </font></font>
    </b><br>
    <b><font size=12 color="#FF0000">Gold(Buy): <font color="000000">
        {{Gold.0}}
    </font></font>
     | <font size=12 color="#FF0000">Gold(Sell): <font color="000000">
        {{Gold.1}}
    </font></font>
    </b><br>
    <b><font size=12 color="#FF0000">Ethereum: <font color="000000">
        {{BTC.Ethereum}}
    </font></font></b><br>
    <b><font size=12 color="#FF0000">Doge Coin: <font color="000000">
        {{BTC.Doge}}
    </font></font></b><br>
    <b><font size=12 color="#FF0000">Lite Coin: <font color="000000">
        {{BTC.Lite}}
    </font></font></b><br>

</body>
</html>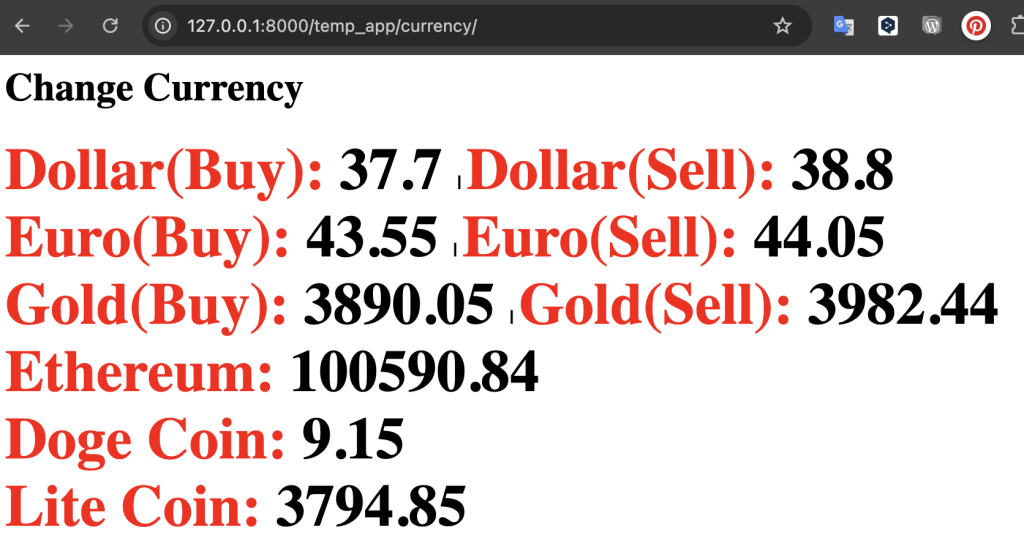
How to Use For Loop with Jinja?
Pulling List Elements with For
How can we pull the elements of the list in the dictionary to the web page with a For loop? For this, let’s first remember our views.py file to print all the elements in the list to the web page with a For loop using the Exchange application.
from django.shortcuts import render
from django.http import HttpResponse
from django.urls import reverse

# Create your views here.
def index(request):
    return render(request,"temp_app/first.html")

def currency(request):
    currency_dict = {"Dollar":[37.7,38.8],
                     "Euro":[43.55,44.05],
                     "Gold":[3890.05,3982.44],
                     "BTC":{"Ethereum":100590.84,"Doge":9.15,"Lite":3794.85}
                     }

    return render(request,"temp_app/currency.html",context=currency_dict)
<html lang="en">
<head>
    <meta charset="UTF-8">
    <meta name="viewport" content="width=device-width, initial-scale=1.0">
    <title>Change Office</title>
</head>
<body>
    <h1>Change Currency</h1>
    <!--Pull Data with Jinja Syntax-->
    {% for item in Euro %}
        <h2>{{item}}</h2>
    {% endfor %}


</body>
</html>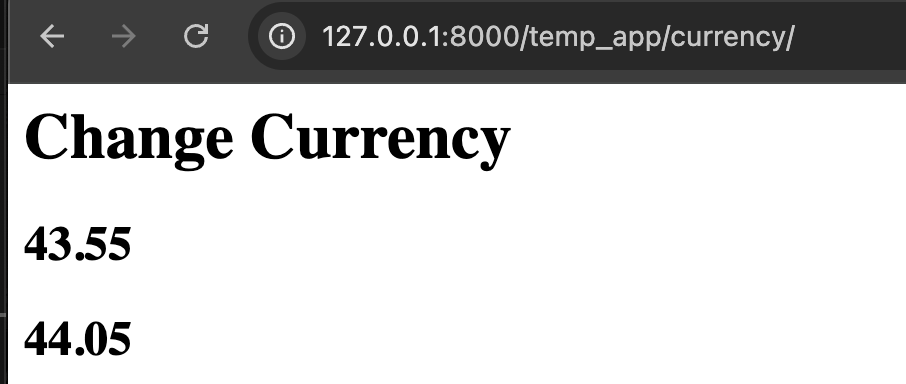
Pulling Dictionary Elements with For
Let’s write the following codes respectively to print the dictionary elements in the dictionary to our Html page.
from django.shortcuts import render
from django.http import HttpResponse
from django.urls import reverse

# Create your views here.
def index(request):
    return render(request,"temp_app/first.html")

def currency(request):
    currency_dict = {"Dollar":[37.7,38.8],
                     "Euro":[43.55,44.05],
                     "Gold":[3890.05,3982.44],
                     "BTC":{"Ethereum":100590.84,"Doge":9.15,"Lite":3794.85}
                     }

    return render(request,"temp_app/currency.html",context=currency_dict)
<html lang="en">
<head>
    <meta charset="UTF-8">
    <meta name="viewport" content="width=device-width, initial-scale=1.0">
    <title>Change Office</title>
</head>
<body>
    <h1>Change Currency</h1>
    <!--Pull Data with Jinja Syntax-->
    {% for key,value in BTC.items %}
        {{key}}:{{value}}<br>
    {% endfor %}

</body>
</html>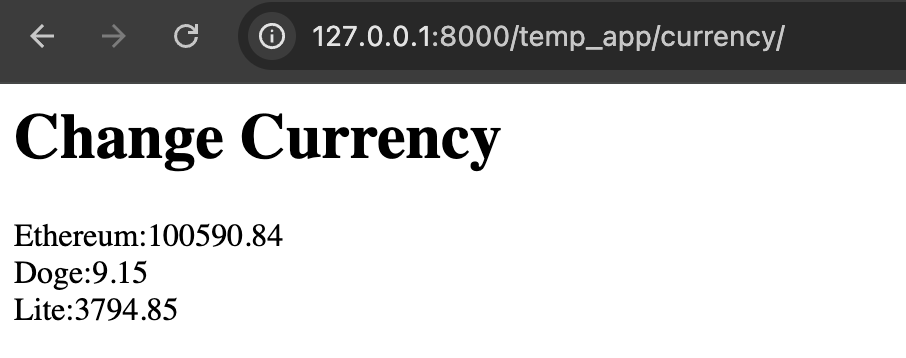
IF-Else Control Structures with Jinja
You can easily use if-else control structures between HTML tags thanks to Jinja Syntax. For this, let’s define a dictionary element named user_pro in views.py and control it with “if” on the HTML side;
from django.shortcuts import render
from django.http import HttpResponse
from django.urls import reverse


def index(request):
    return render(request,"temp_app/first.html")

def currency(request):
    currency_dict = {
    "Dollar":38.8, "Euro":44.05, "Gold":3982.44, "BTC":4237678.26, "user_pro":True
    }

return render(request,"temp_app/currency.html",context=currency_dict)<html lang="en">
<head>
<meta charset="UTF-8">
<meta name="viewport" content="width=device-width, initial-scale=1.0">
<title>Change Office</title>
</head>
<body>
<h1>Change Currency</h1>
<!--Pull Data with Jinja Syntax-->
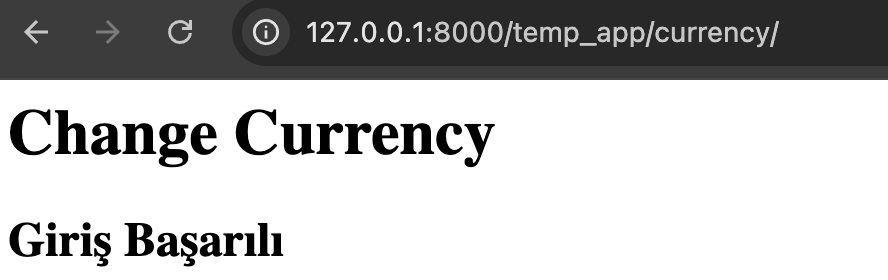
{% if user_pro %}
<h2>Pro Giriş Başarılı</h2>
{% endif %}
</body>
</html>Screenshot:
If we change the value of the dictionary element to False, “Login Successful” will not appear.
You can also print different information on the screen according to the incoming value. As a scenario, if the price of the dollar is above 35 , we can write a warning such as “The increase in the dollar is high.” We will not make any changes in the views.py file. Only the html page will be added.
{% if Dollar.1 > 35 %}
mission-1
{% else %}
mission-2
{% endif %}
<html lang="en">
<head>
    <meta charset="UTF-8">
    <meta name="viewport" content="width=device-width, initial-scale=1.0">
    <title>Change Office</title>
</head>
<body>
    <h1>Change Currency</h1>
    <!--Pull Data with Jinja Syntax-->
    {% if Dollar.1 > 35 %}
        <h2>Dollar is the most expensive {{Dollar.1}}</h2>
    {% else %}
        <h2>Dollar is very cheap  {{Dollar.1}}</h2>
    {% endif %}

</body>
</html>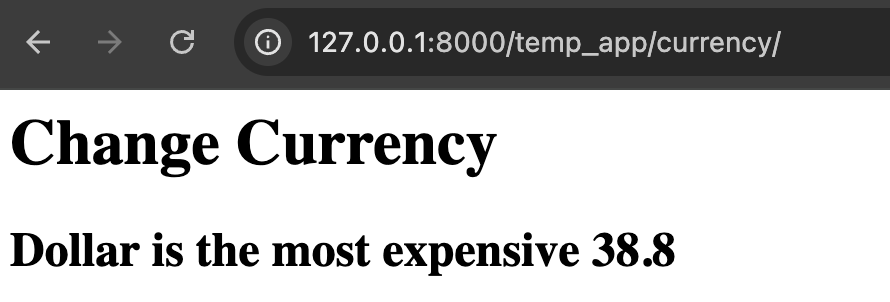
Jinja Syntax with Filter Procedure
We have experimented Django with Jinja Syntax, which is quite useful. Now let’s see how to use it in Django Template with the Filter procedure. For this you need to access Django Docs via the link below.
https://docs.djangoproject.com/en/5.2/ref/templates/builtins
In this web page you can learn which syntax to use and for what purpose.
To use Filter, click on the category links on the right side of this web page and click on the one that says “Filter”. You can use many functions such as string functions. You can see all of this in the documentation.
It is written with the symbol “|” (pipe AltGr+<>). So it is written as {{{testing | upper}}. Let’s see with an example;
from django.shortcuts import render
from django.http import HttpResponse
from django.urls import reverse


def index(request):
    return render(request,"temp_app/first.html")

def currency(request):
    currency_dict = {
    "testing" : TesT iS oK
    }

return render(request,"temp_app/currency.html",context=currency_dict)<html lang="en">
<head>
<meta charset="UTF-8">
<meta name="viewport" content="width=device-width, initial-scale=1.0">
<title>Change Office</title>
</head>
<body>
<h1>Change Currency</h1>
<!--Pull Data with Jinja Syntax-->
<b>Original:</b> {{testing}}<br>
<b>Upper:</b> {{testing | upper}}<br>
<b>Lower:</b> {{testing | lower}}<br>
</body>
</html>Screenshot:
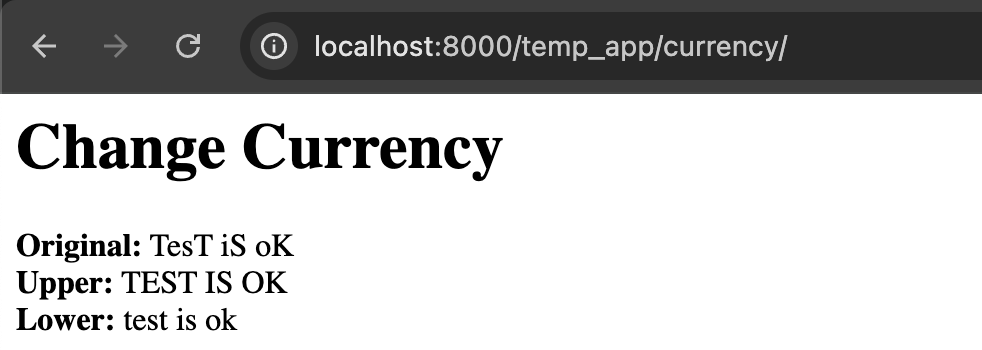
As a result, we have enlarged or minimized an entire string expression written in mixed case. We could have done this using Python codes on the views.py side, but it is useful to know that there is a usage in this way as well.
When there are multiple applications and modules, you will need to use this method professionally to manage the link navigation between them without causing confusion.
For URL management with Jinja, we will need to add lines in app/urls.py and currency.html.
First of all, to add the namespace, we will assign the application name to a variable at the beginning of app/urls.py:
from django.urls import path
from . import views

app_name = "temp_app"

urlpatterns = [
    path("",views.index,name="index"),
    path("currency/",views.currency,name="currency"),
    path("earthquake/",views.earthquake,name="earthquake")

]It is recommended to do this for all apps. This will make the apps more manageable. Now we will create a permalink in the HTML file by linking within the page as in line 10 below:
<html lang="en">
<head>
    <meta charset="UTF-8">
    <meta name="viewport" content="width=device-width, initial-scale=1.0">
    <title>Change Office</title>
</head>
<body>
    <h1>Change Currency</h1>

     <h2><a href="{% url 'temp_app:earthquake' %}">Earthquake Page</a></h2>
     <h2><a href="{% url 'temp_app:index' %}">Home Page</a></h2>

</body>
</html>Screenshot:
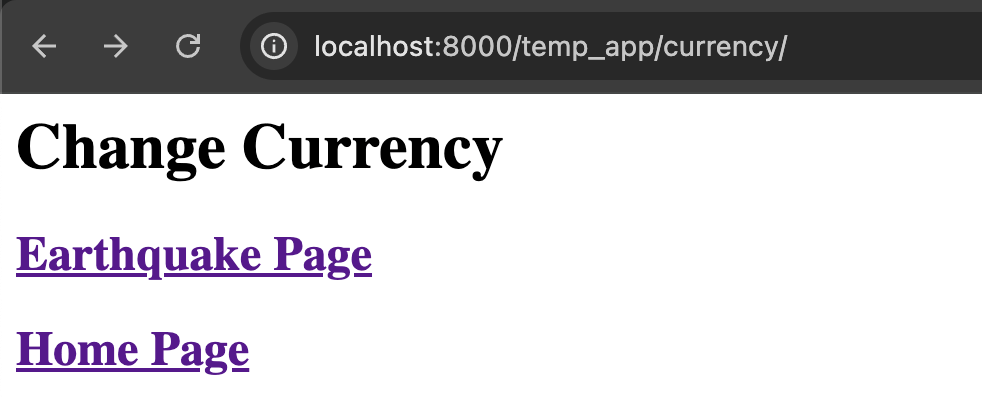
When you click on the links, you will be redirected to the relevant pages. This way you can easily switch between different applications.
Inheritance in Django Template Html (Template Inheritance)
By creating a template base, it allows the application and the entire project to be used ready-made as a template. I’m talking about designs like a navigation bar, footer bar, header bar, hamburger menu.
You can use Bootstrap here. Now we will create the app in the root directory called templates. Then create the basic HTML template in this folder. Let’s call it base.html.
Let’s first define the JS and Css files that will be referenced from the Bootstrap site into base.html. You can copy the current Js and Css url addresses from the Bootstrap site.
Now let’s start by adding these two source url addresses into base.html. Also, let’s copy <style>…</style> from the source code of Bootstrap/Navbar Fixed page and <nav>…</nav> in the body block into base.html.
<html lang="en">
<head>
<meta charset="UTF-8">
<meta name="viewport" content="width=device-width, initial-scale=1.0">
<title>Base Web Template</title>
<link href="https://cdn.jsdelivr.net/npm/bootstrap@5.3.6/dist/css/bootstrap.min.css" rel="stylesheet" integrity="sha384-4Q6Gf2aSP4eDXB8Miphtr37CMZZQ5oXLH2yaXMJ2w8e2ZtHTl7GptT4jmndRuHDT" crossorigin="anonymous">
<script src="https://cdn.jsdelivr.net/npm/bootstrap@5.3.6/dist/js/bootstrap.bundle.min.js" integrity="sha384-j1CDi7MgGQ12Z7Qab0qlWQ/Qqz24Gc6BM0thvEMVjHnfYGF0rmFCozFSxQBxwHKO" crossorigin="anonymous"></script>
<style>.bd-placeholder-img{font-size:1.125rem;text-anchor:middle;-webkit-user-select:none;-moz-user-select:none;user-select:none}@media (min-width: 768px){.bd-placeholder-img-lg{font-size:3.5rem}}.b-example-divider{width:100%;height:3rem;background-color:#0000001a;border:solid rgba(0,0,0,.15);border-width:1px 0;box-shadow:inset 0 .5em 1.5em #0000001a,inset 0 .125em .5em #00000026}.b-example-vr{flex-shrink:0;width:1.5rem;height:100vh}.bi{vertical-align:-.125em;fill:currentColor}.nav-scroller{position:relative;z-index:2;height:2.75rem;overflow-y:hidden}.nav-scroller .nav{display:flex;flex-wrap:nowrap;padding-bottom:1rem;margin-top:-1px;overflow-x:auto;text-align:center;white-space:nowrap;-webkit-overflow-scrolling:touch}.btn-bd-primary{--bd-violet-bg: #712cf9;--bd-violet-rgb: 112.520718, 44.062154, 249.437846;--bs-btn-font-weight: 600;--bs-btn-color: var(--bs-white);--bs-btn-bg: var(--bd-violet-bg);--bs-btn-border-color: var(--bd-violet-bg);--bs-btn-hover-color: var(--bs-white);--bs-btn-hover-bg: #6528e0;--bs-btn-hover-border-color: #6528e0;--bs-btn-focus-shadow-rgb: var(--bd-violet-rgb);--bs-btn-active-color: var(--bs-btn-hover-color);--bs-btn-active-bg: #5a23c8;--bs-btn-active-border-color: #5a23c8}.bd-mode-toggle{z-index:1500}.bd-mode-toggle .bi{width:1em;height:1em}.bd-mode-toggle .dropdown-menu .active .bi{display:block!important}
</style>
</head>
<body>
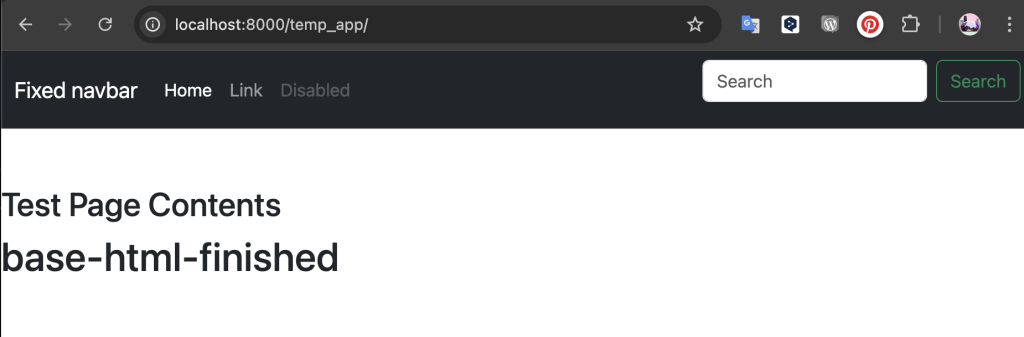
<nav class="navbar navbar-expand-md navbar-dark fixed-top bg-dark"> <div class="container-fluid"> <a class="navbar-brand" href="#">Fixed navbar</a> <button class="navbar-toggler" type="button" data-bs-toggle="collapse" data-bs-target="#navbarCollapse" aria-controls="navbarCollapse" aria-expanded="false" aria-label="Toggle navigation"> <span class="navbar-toggler-icon"></span> </button> <div class="collapse navbar-collapse" id="navbarCollapse"> <ul class="navbar-nav me-auto mb-2 mb-md-0"> <li class="nav-item"> <a class="nav-link active" aria-current="page" href="#">Home</a> </li> <li class="nav-item"> <a class="nav-link" href="#">Link</a> </li> <li class="nav-item"> <a class="nav-link disabled" aria-disabled="true">Disabled</a> </li> </ul> <form class="d-flex" role="search"> <input class="form-control me-2" type="search" placeholder="Search" aria-label="Search"> <button class="btn btn-outline-success" type="submit">Search</button> </form> </div> </div> </nav>
{% block content %}
{% endblock content %}
<h1>base-html-finished</h1>
</body>
</html>Create Jinja syntax lines in base.html as shown in lines 14 and 16 above.
{% block content %}
{% endblock content %}
In the next step, let’s create an html page named first.html in our previous application temp_app. We will extend this base.html template we created into first.html as follows.
{% extends 'base.html' %}

{% block content %}

<br><br><br><br><br>
<h2>Test Page Contents</h2>

{% endblock %}In order to use the templates, including the base.html page, it is necessary to define the templates directory in settings.py, which we open in the root directory and in which we create the base.html file.
In settings.py, where it says “DIRS:” in the line starting with “TEMPLATES = [“, add the following line:
TEMPLATES = [
    {
        "BACKEND": "django.template.backends.django.DjangoTemplates",
        "DIRS": [os.path.join(BASE_DIR,"../templates")],
        "APP_DIRS": True,
        "OPTIONS": {
            "context_processors": [
                "django.template.context_processors.request",
                "django.contrib.auth.context_processors.auth",
                "django.contrib.messages.context_processors.messages",
],Also in views.py, the first.html page should be defined as the index page as follows:
from django.shortcuts import render
from django.http import HttpResponse
from django.urls import reverse
import requests as req
import datetime as dt

# Create your views here.
def index(request):
return render(request,"temp_app/first.html")In this way, the first.html page will inheritance the base.html page. As a reminder, we do the same thing in PHP using include.
Screenshot:
In the same way, we can define base.html as a template in currency.html that we designed before. Delete the html tags in currency and leave only the following lines. Let’s apply extends at the beginning and end:
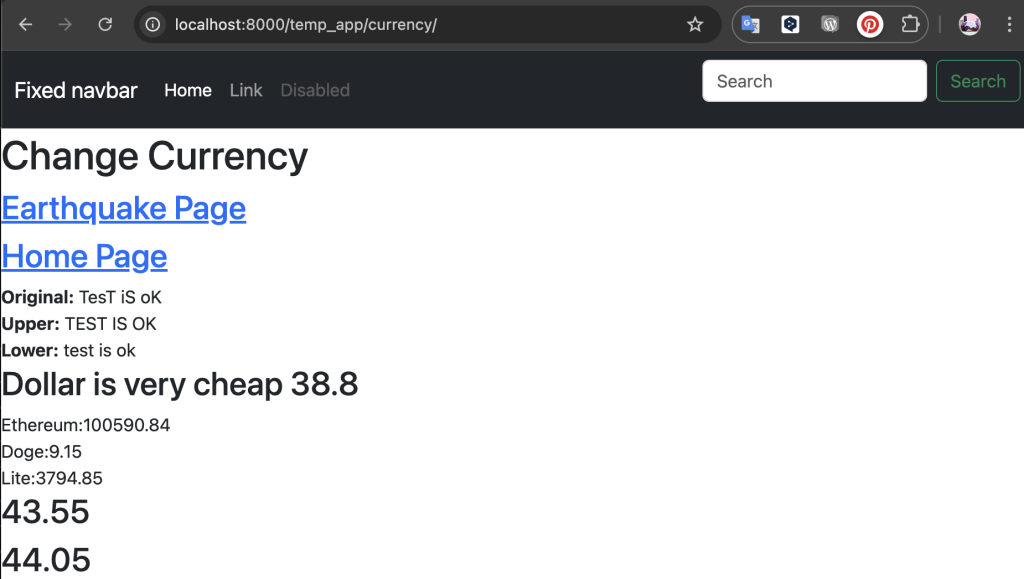
{% extends 'base.html' %}

{% block content %}

    <h1>Change Currency</h1>
    <!--Pull Data with Jinja Syntax-->

    <h2><a href="{% url 'temp_app:earthquake' %}">Earthquake Page</a></h2>
    <h2><a href="{% url 'temp_app:index' %}">Home Page</a></h2>

    <b>Original:</b> {{testing}}<br>
    <b>Upper:</b> {{testing | upper}}<br>
    <b>Lower:</b> {{testing | lower}}<br>


    {% if Dollar.1 > 39 %}
        <h2>Dollar is the most expensive {{Dollar.1}}</h2>
    {% else %}
        <h2>Dollar is very cheap  {{Dollar.1}}</h2>
    {% endif %}

    {% for key,value in BTC.items %}
        {{key}}:{{value}}<br>
    {% endfor %}

    {% for item in Euro %}
        <h2>{{item}}</h2>
    {% endfor %}


{% endblock %}Screenshot:
To redirect to the desired page in the “<a href=…..” tag of the menus in base.html:
{% url ‘temp_app:currency’ %}
or
{% url ‘temp_app:earthquake’ %}
to dynamically define the pages as python code.
How to Make a Fixed 404 Page with Django?
In this section you will see how to define a static page like a 404 page in Python using Django with Jinja Syntax. First, in settings.py, set the DEBUG line to False and change the ALLOWED_HOSTS setting as follows to allow the server to run.
DEBUG = False
ALLOWED_HOSTS = [“localhost”, “127.0.0.1”]
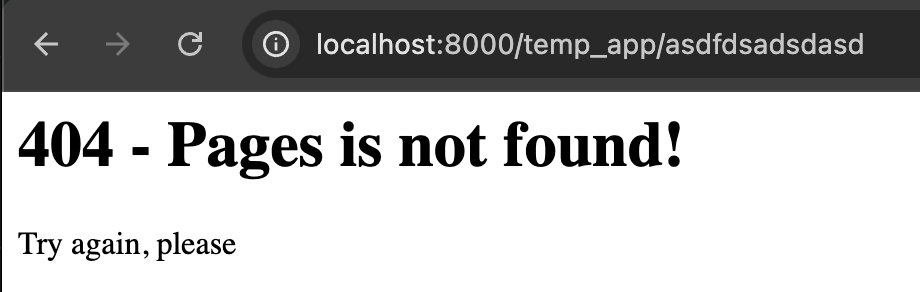
Then create a file named 404.html in the templates folder in the root directory. The file name must be 404.html. Make a simple design in this page like below:
<html lang="en">
<head>
    <meta charset="UTF-8">
    <meta name="viewport" content="width=device-width, initial-scale=1.0">
    <title>404 - Page is not Found</title>
</head>
<body>
    <h1>404 - Pages is not found!</h1>
    <p>Try again, please</p>

</body>
</html>From the browser, type the url address of a non-existent page and press enter. (http://localhost:8000/temp_app/asdfdsadsdasd)
Screenshot:
Creating Static Pages and Media
Just like the “404 Page Not Found” page, you will need to make some changes to be able to define pages or media files. First, find the line STATIC_URL = “static/” in settings.py.
Create a folder called static in the directory where your app is. Then create a “temp_app” folder inside this folder with the same name as your app. Then copy any media file into this folder.
The VS Code Explorer panel will look like this:
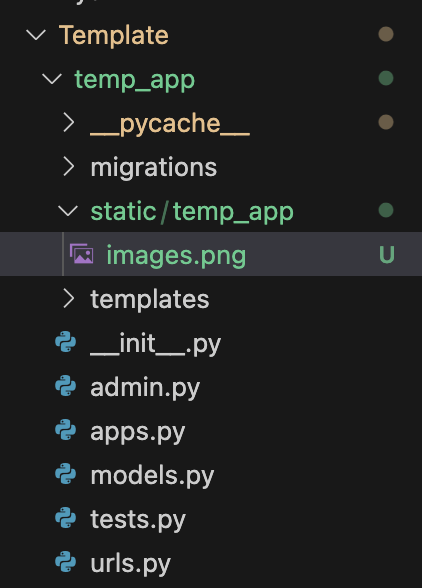
After this stage, we can use the image named image.png in Html pages. In the html page
{% load static %}
Define the files in the static folder using the Jinja syntax. After that, you will be able to use images.png file directly in html tags.
Let’s show this image file in first.html:
{% extends 'base.html' %}
{% load static %}

{% block content %}
<br><br><br><br><br>
<h2>Test Page Contents</h2>

<img src="{% static '/temp_app/images.png' %}" alt="404 Logo">

{% endblock %}In settings.py file for the “load static” syntax to work
DEBUG=True
ALLOWED_HOSTS=[ ]
Otherwise it will not work.
With Jinja Syntax, we learned how to make a simple web page using Python codes with Django.


MAKE A COMMENT
COMMENTS - 0 COMMENTS